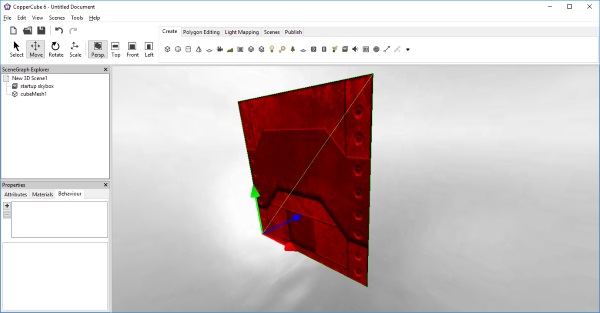
The resulting generated geometry
 0-----1
 |     |
 |     |
 2-----3
 0-----1
 |   / |
 | /   |
 2-----3
// use the currently selected node in the editor

var meshnode = editorGetSelectedSceneNode();
var bufferCount = ccbGetSceneNodeMeshBufferCount(meshnode);

if (bufferCount == 0)
  alert('The selected node has no 3D geometry.');
else
{
	// get old texture of that node
	var oldTexture = ccbGetSceneNodeMaterialProperty(meshnode, 0, "Texture1");

	// remove all mesh buffers holding geometry, because we want to replace its geometry with a totally new one
	for (var i=0; i<bufferCount; ++i)
		ccbRemoveMeshBuffer(meshnode, 0);

	// add new buffer
	ccbAddMeshBuffer(meshnode);

	// disable dynamic lighting and set a texture
	ccbSetSceneNodeMaterialProperty(meshnode, 0, 'Lighting', false);
	ccbSetSceneNodeMaterialProperty(meshnode, 0, "Texture1", oldTexture);

	// add 4 vertices
	ccbAddMeshBufferVertex(meshnode, 0, new vector3d(0,10,0));
	ccbAddMeshBufferVertex(meshnode, 0, new vector3d(10,10,0));
	ccbAddMeshBufferVertex(meshnode, 0, new vector3d(0,0,0));
	ccbAddMeshBufferVertex(meshnode, 0, new vector3d(10,0,0));

	// set their colors
	ccbSetMeshBufferVertexColor(meshnode, 0, 0, 0x77400000);
	ccbSetMeshBufferVertexColor(meshnode, 0, 1, 0x77400000);
	ccbSetMeshBufferVertexColor(meshnode, 0, 2, 0x77400000);
	ccbSetMeshBufferVertexColor(meshnode, 0, 3, 0x77400000);

	// set texture coordinate
	ccbSetMeshBufferVertexTextureCoord(meshnode, 0, 0, new vector3d(0,1,0));
	ccbSetMeshBufferVertexTextureCoord(meshnode, 0, 1, new vector3d(1,1,0));
	ccbSetMeshBufferVertexTextureCoord(meshnode, 0, 2, new vector3d(0,0,0));
	ccbSetMeshBufferVertexTextureCoord(meshnode, 0, 3, new vector3d(1,0,0));

	// add 6 indices, to create 2 triangles from this.
	// note that the order is important. If you are adding the indices
	// 0,1,2, you create a triangle facing into forward direction,
	// if you add it with 0,2,1, it will face into the opposite direction.

	ccbAddMeshBufferIndex(meshnode, 0, 0);
	ccbAddMeshBufferIndex(meshnode, 0, 1);
	ccbAddMeshBufferIndex(meshnode, 0, 2);
	ccbAddMeshBufferIndex(meshnode, 0, 1);
	ccbAddMeshBufferIndex(meshnode, 0, 3);
	ccbAddMeshBufferIndex(meshnode, 0, 2);

	// update the bounding box of the node
	ccbUpdateSceneNodeBoundingBox(meshnode);
}