Back to Content
Defining Camera Controllers
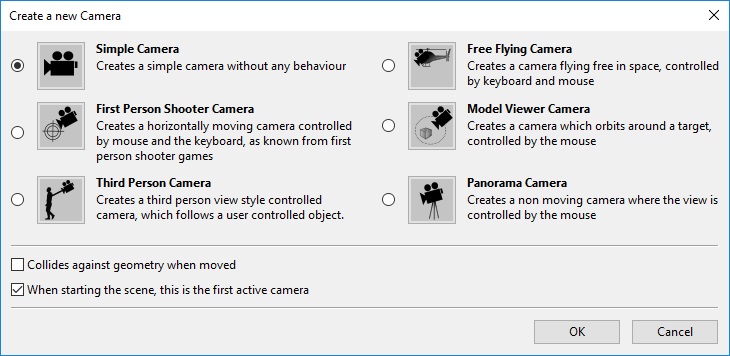
In order to define how the users of your CopperCube application should control the camera, you need to add a camera object to your scene. Simply click the camera button in the scene editing toolbar tab and a dialog will open where you can select which camera type to use:
 Dialog for new cameras
There are a few camera types to choose from:
- Simple Camera: A very simple camera, which doesn't move at all. This camera type is also very useful when you want to program your own camera controller.
- Free flying camera: A camera as known from first person shooter games. You can fly around freely using the cursor keys and look around using the mouse.
- FPS Camera: A camera as known from first person shooter games. You can move around using the cursor keys and look around using the mouse.
- Model Viewer Camera: Orbiting the object at the target of your camera.
- And some others
Also note that by default, the new camera will collide with walls in your scene when moved, and will be active when entering the scene. If you don't want this, uncheck the options below.
Adjusting the camera controller settings
After you added a new camera the the scene, you can find the settings of the Camera Controller in the 'Behavior' tab. Usually, there is a 'First Person Shooter style controlled' behavior (for 'Free flying' and 'FPS' cameras) or a 'Model Viewer Camera style controlled' behavior, and if you selected 'collides against geometry when moved', then there should be a 'Collides when moved') behavior as well:
 Dialog for new cameras
By selecting one of the behaviors, you can adjust its values, like the movement speed or the distance to the center of the model controller camera. You can add new behaviors with the '+' button and delete existing ones with the '-' button, but be careful with this.
Look Direction
After you've added a new camera, you might notice that it will have a line connecting to a point in space:
 The camera target
This small point indicates the direction where the camera will look at. You can set a new target position when you select the camera taret point and simply move it:
 Changing the target of a camera
The camera target is not only the place where the camera will initially look at, but also the rotation center for Model viewer Controlled Cameras.
Collision
After you've added a new camera and selected 'collides against geometry when moved', you might notice that it will have a yellow ellipsoid drawn around it when selected:
 Yellow collision ellipsoid around the selected camera
This is caused by a 'Behavior' which was added to the camera. This behavior is named 'collide when moved' and can be found in the 'Behavior' tab of the properties window:
 The 'collide when moved' behavior
When selecting the 'Collide when moved' behavior, you can edit its settings. The 'Size' settings influences the size of the ellipsoid around the camera, so this is the body size of the person moving the camera. If you want to adjust the position of the head or the eyes in the collision body, change the value in 'Relative Position'. For enabling gravity, so that the camera is falling down, check "AffectedByGravity". For a bigger or lower gravity, you can adjust the value of 'Gravity' in the properties (='Attributes') of the root scene object. Choose for example "-100" for a very strong gravity going down, or "0" for no gravity.
If you need to exactly set against what items in your scene the camera collides, set or unset the 'Collision' checkbox in the attributes tab of the relevant item in the scene.
Getting stuck
Sometimes, it is possible to get stuck in the geometry when moving. Always place the camera at a position so that the yellow
ellipsoid isn't colliding with a wall in the beginning, so that it is not stuck.
If the camera gets stuck during movement, then the problem might be the 3d mesh:
One needs to be a bit careful when modelling the static geometry the camera collides against.
The geometry should be closed, and there should not be any one sided polygons sticking out anywhere,
those are usually the places where one gets stuck.
Also, if the points of vertices which should be together are not exactly at the same point could cause problems.
If the used 3d modelling software supports a feature like 'Merge Points' to make neighbour vertices be exactly
at the same place, it is recommended to do this, it also usually helps.